为了防止树莓派长时间开机运转温度过高导致触发过热关机,很多人都给装了散热风扇,但某宝买的风扇插上之后是随着开机一直运转的,不能随温度变化而自动开闭,很多时候做无用功浪费电且产生噪音。本文将以一个硬件小白的程序员视角详细讲述如何用三极管扩展普通的树莓派散热风扇从而实现温控功能。
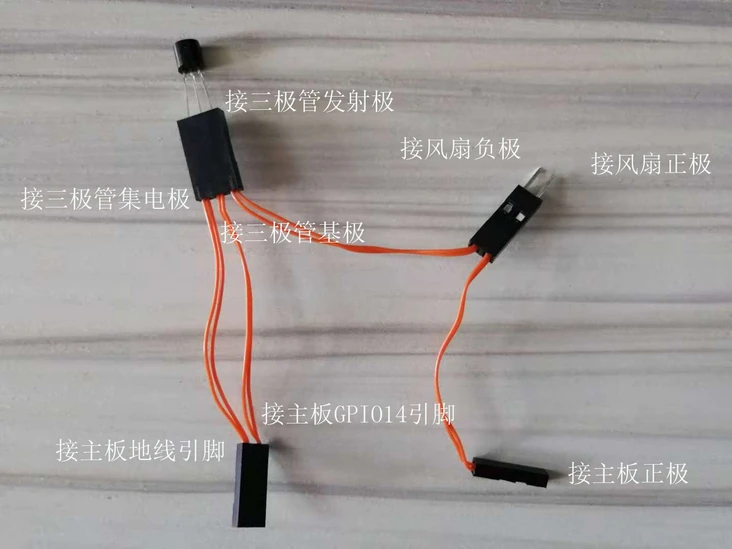
三极管与风扇组装与编写python脚本 在制作自己的温控风扇前,本人也查阅了网上其他资料,最终选用了三极管方案,在接线方式中选择了自制杜邦线连接三极管和风扇,这样的好处是线材的长度可以随自己需要裁剪,而且可以轻松塞进树莓派的外壳中。全程无焊接,以后不用也可方便拆卸线材、杜邦头、三极管元件等用作其他用途。
准备材料 以下材料均可某宝购买,为了省事其中杜邦头和杜邦胶壳是买的套件,一盒里边有公母端子各200个,以及各种类型的胶壳。
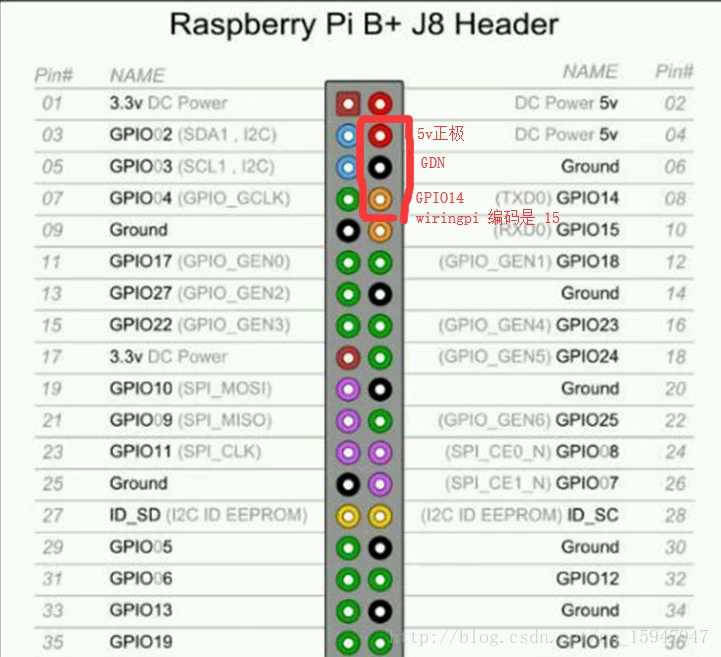
第一步:接线
第二步:写驱动程序 执行驱动脚本前需要安装相关依赖yum install -y python-devel,以及RPi.GPIO模块wget https://link.segmentfault.com/?enc=icmzpVF96GFYqsyL2oI8vw%3D%3D.NZ%2F%2Bh1fHum%2Flz7bmUPouwTHUsHE6HZ962%2BlYNkkVZJO4ZQnbTDjCfiTIKb1hy7lctpbNeYIuOK7ZU3w%2BWfj1eb0TEBBqXw1GgLcPh%2FqT5vc%2BOk%2F2sqjwULL7bdZUk8jY
附上驱动代码:
1 2 3 4 5 6 7 8 9 10 11 12 13 14 15 16 17 18 19 20 21 22 23 24 25 26 27 28 29 30 31 32 33 34 35 36 37 38 39 40 41 42 43 import sysimport timetry : import RPi.GPIO as GPIO except RuntimeError: print ("Error importing RPi.GPIO! This is probably because you need superuser privileges. You can achieve this by using 'sudo' to run your script" ) def cpu_temp (): with open ("/sys/class/thermal/thermal_zone0/temp" , 'r' ) as f: return float (f.read())/1000 def main (): channel = 14 GPIO.setmode(GPIO.BCM) GPIO.setwarnings(False ) GPIO.setup(channel, GPIO.OUT, initial=GPIO.LOW) is_close = False while True : temp = cpu_temp() if is_close == True : if temp > 60.0 : GPIO.output(channel, GPIO.LOW) is_close = False else : if temp < 55.0 : GPIO.output(channel, GPIO.HIGH) is_close = True time.sleep(15.0 ) if __name__ == '__main__' : main()
保存到/usr/local/scripts/目录下
本人的启动脚本:nohup python -u /usr/local/scripts/pi_fan.py >/usr/local/scripts/tempctl.log 2>&1 &
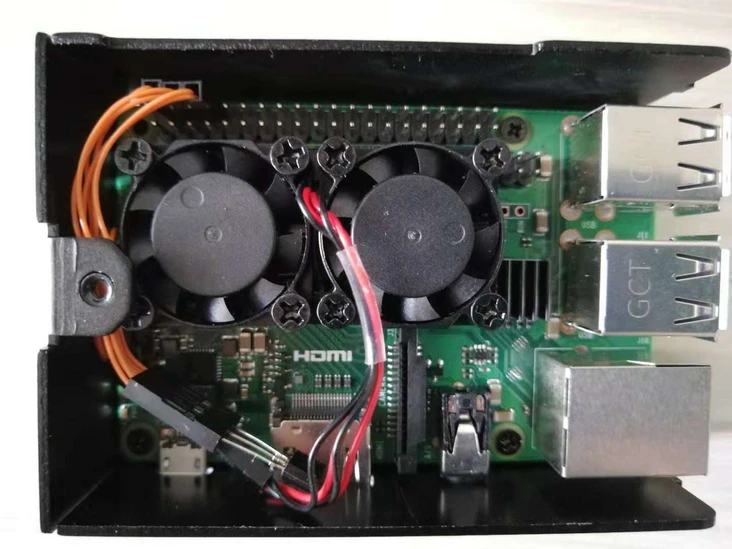
最终成果:
设置脚本后台运行和开机自动启动 添加脚本到 init.d 目录,这个目录包含在引导过程中启动的脚本(这里的所有程序都是在关闭或重新引导系统时执行的)。
修改程序文件的权限 1 sudo chmod 777 pi_fan.py
进入 init.d 目录 创建一个文件名为pi_fan 编辑pi_fan文件 添加以下内容 1 2 3 4 5 6 7 8 9 10 11 12 13 14 15 16 17 18 19 20 #!/bin/sh case $1 in start) nohup python3 /usr/local/scripts/pi_fan.py & ;; stop) ;; *) echo "Usage: $0 (start|stop)" ;; esac
保存退出,然后修改此文件的权限 设置开机自启 1 sudo update-rc.d pi_fan defaults
启动服务 1 sudo service pi_fan start
重启 停止服务 1 sudo service pi_fan stop
取消开机自动运行 1 sudo update-rc.d pi_fan remove
参考:https://segmentfault.com/a/1190000017225701